Sharp Reflections

Sunday, December 15, 2013

My New Dining Room Studio: Christmas Photography

I have an overabundance of Christmas decorations. So this year I decided to fill my dining room with holiday cheer and invite some friends and family over for photos. It was so much fun and everyone looked great. I'm looking forward to doing New Year's themed photos in January!

Face paint was a big hit this year!

I love Photoshop

The stuffed Rudolf was a favorite of all the kids.

He was upset when he found out the wrapped presents were empty.


One can never have enough pictures of babies sleeping in baskets.


Merry Christmas Everyone!


Friday, December 13, 2013

Free Christmas Printables


I wanted my kids to have fun Christmas themed worksheets to enjoy during this holiday season. So, I made some and combined them with others from the web and I want to share it with you!

This is an 18 page Christmas printable that includes:

  • One song to sing or memorize
  •  A stocking to color
  • Christmas tree Color by number 
  • Christmas ornament Craft idea
  • Christmas beginning sounds, counting, same or different, matching, rhyming and pattern worksheets (courtesy of preschool-printable-activities.com)
  • A write the word, color the picture reindeer  (courtesy of abcteach.com)
  • A craft freebie (courtesy of preschoolforayear.com)


Click here to view and print the Christmas Worksheets for Preschoolers

Enjoy!


Sick Days with Little Ones: The Pintrest Playroom Project

The stomach "flu" just hit my family. I knew the kids and I were going to be completely house ridden for a good week.I didn't want the kids and I to sit on the couch all week and waste away our time together watching Christmas specials. Not that there is anything wrong with Christmas specials. I LOVE them and for the first few sick days, we did LOTS of Christmas Stuff. BUT I wanted to stay away from the boob tube as much as possible. So, I took to my Pintrest board and decided the kids and I would try and pull off as many Pintrest projects as possible while we were home sick. This meant we could only use things we had on-hand at home. There was no running out to the store for us!

On Tuesday, at 8:23am, we started with this...


I got the idea from No One Has More Fun Then The Adam's. This was great because we have, like, 5 strainers in this house and I was happy to repurpose one for the kids to play with.

By 9:03am we'd created this ...


I pinned this idea from toddlerapproved.com. Toddler Approved drew theirs on butcher paper. I happen to have these super sturdy white boards sitting in our playroom for months. I can't even remember where they came from but I thought they were perfect for this game. I duct taped the boards together and drew on some shapes. The kids helped too. The kids come up with their own "games" for this but I would call out the shape or color, or both, then the kids would jump to it. 

TIP: When doing projects like this, go ahead and let your kids do it the way they want to do it. It doesn't have to be "perfect". Ethan drew a really fantastic circle, all on his own, then he scribbled all over it with marker. I fixed it up later by coloring it in with blue.  

Zoey drew some shapes on with green crayon too. Then she smeared green finger paint all over. I cleaned it up when she lost interest. It looked sloppy and messy but that's fine!


Another Idea I pinned came from Babycenter.com. HOPSCOTCH! Zoey loves playing hopscotch outside in the summer. So we flipped our shape and color game board over and drew our own. I let Zo pick a hopscotch design she liked after looking at a bunch in a Google image search. Zoey drew in some numbers and picked the colors she wanted for the squares. OH! But before that, E and Liv had a blast with the finger paint and gave our board a little extra something-something. Zoey came up with a fun way to play using her Fishing Busy Bag which was given to us at our MOMS Club busy bag exchange.


MOVING ON!

www.projectgreenify.com was where I pinned the idea for this masterpiece...


My totally awesome husband finished building this house around 12:30pm. Then I built the shelf (the shelf was Zoey's Idea). 

AN HOUR AND A HALF LATER...  


 The kids and I were filling balloons with rice, oatmeal, water, beans, play-doh... you name it. Tot Treasures gave me the pin for this Gem..


 TIP: See the corn all over the counter? If you have a dustbuster... use it with a smile when the kids spill while trying to fill the balloons or when your eldest throws the rice baloon across the kitchen and it explodes all over the place.  I blame myself for using old cheap balloons left over from ZoZo's birthday party. 

 Daddy was not home while we filled our balloons. So when he got home Zoey and E taught him how we did it.

STEP 1
Fill a plastic squeeze bottle with your choice of stuffing. My man picked coffee beans.

STEP 2
Blow up the balloon and pinch the end shut.

STEP 3
Slip the end of the balloon over the squeeze bottle (with cap off), turn it upside down and shake the stuffing in. Then just pop the balloon off and tie it.


HOLY COW You guys! I am tired just thinking back to all this. (It being 11pm right now has nothing to do with me being tired right?)


At 3:00pm we were making block puzzles on the walls and door with painters tape. 

Special thanks to Not Just Cute for this fun game.

Zo made her puzzle on the door
I made mine under the table

She used her feet to store her tape. Cute.
Put tape right on the blocks to measure.  


5:30PM - Our Grand Finale for the day was all Zoey's Idea. I was cleaning up and asked her, "What should I do with all these balls we have Zo?" 


Yeah... we have a ball pit under the stairs now. My hubby hung a red rope light inside. 


Stayed tuned for Day 2 of our Pintrest Playroom Project


Monday, November 25, 2013

My Little Pony Decorations: The Cutie Clouds


Zoey and I needed decorations for her 4th Birthday party and I wanted to use items I have on-hand to make them. We spent an entire month crafting decorations together.  Since we had recently moved into a new house and had a ton of cardboard boxes hanging around, we used them to make My Little Pony: Friendship is Magic "Cutie Clouds."

This was really fun to do with my two older kids. I really lucked out on this project since the kids were actually working well together. If my littlest one had been awake, she probably would have tried eating the paint and crawling all over the clouds while they were still wet... it would have been rather stressful. Thank heavens for nap time.

 Things You'll Need
  • A few large cardboard boxes 
  • Markers, crayons, stickers...
  • Paint (I used leftover house paint)
  • A knife (I used a serrated carving knife)
  • Paint Brushes
  • A tarp (maybe)

Directions
(in case you can't tell from just looking at them ;-p)
  1. Pick a place to set up. Use the tarp if you are planning to paint with the kids and you need to keep things clean.
  2. Give your kid(s) a cardboard box, pencils, markers, crayons, stickers... whatever you have on hand and let them begin to decorate and play with their box.
  3. Draw clouds on the sides of the boxes. (I used Google to find images of clouds from the show, My Little Pony: Friendship is Magic
  4.  Use the serrated knife to cut the clouds out.
  5. Get to painting! To start, paint each cloud one color or let the kids paint and just follow their lead! CAUTION: let's be honest here, painting projects with little ones will likely involve fighting over who uses what color or brush... so make sure you are in a good mood and energetic before you even THINK about doing this.
  6. Once the clouds are all painted and have dried, paint the swirls on them and your done!

 I intended to hang these from the branches of our cherry tree for the party. Unfortunately the weather didn't cooperate. So I used them as decoration inside instead. (I don't have a picture of this...sorry.)

So... what did I do with the clouds AFTER the party??? I hung them in the playroom. They go nicely with the Twilight Sparkle I drew on the wall last winter. Then, I used them as decoration in the living room when we threw our My Little Pony: Season Four Premier Party . And I'm sure I'll find even more uses for them in the future. 


Friday, November 8, 2013

Things To Do With Kids In The Burbs


Things to do with kids in schaumburg
I wish I could go to google.com, type in, "What activities can I do with my 3 small kids today?" and have a huge list of all the cool (and preferably very inexpensive or FREE) activities, going on in my area, pop up. Then I could pick the one that sounds the best and just be on my way. We'll, now I can and so can you! Here is my, Family Fun with Little Ones, Google Calendar. 

For the last couple months I've been compiling this massive calendar, full of things to do with kids in Roselle, Bloomingdale, Itasca, Elk Grove Village, Hoffman Estates, Medinah, Bartlett, Streamwood and Schaumburg, Illinois. I know there is still more I want to add and there will be a ton of maintenance work to do in order to keep it accurate and current. 

I hope someone else out there finds this list useful. Any day of the week, any time of day, if you are looking for something to do with your kids you can come to this calender, scroll through it, and find something to do. I know it's not perfect (let's face it, I have three young children and run my own family business, so I have limited spurts of time to spend on this). 

If you see an activity on the calendar you'd like to do, click on the Groupon banner below to see if there is a deal on it! 

find things to do with kids in Schaumburg


Please, I Urge You to contact me if you think of anything I could add or need to change on this calendar!

Thanks and Enjoy!


Sunday, September 8, 2013

Crafting with Toddlers - Retro Starburst Bathroom Mirror

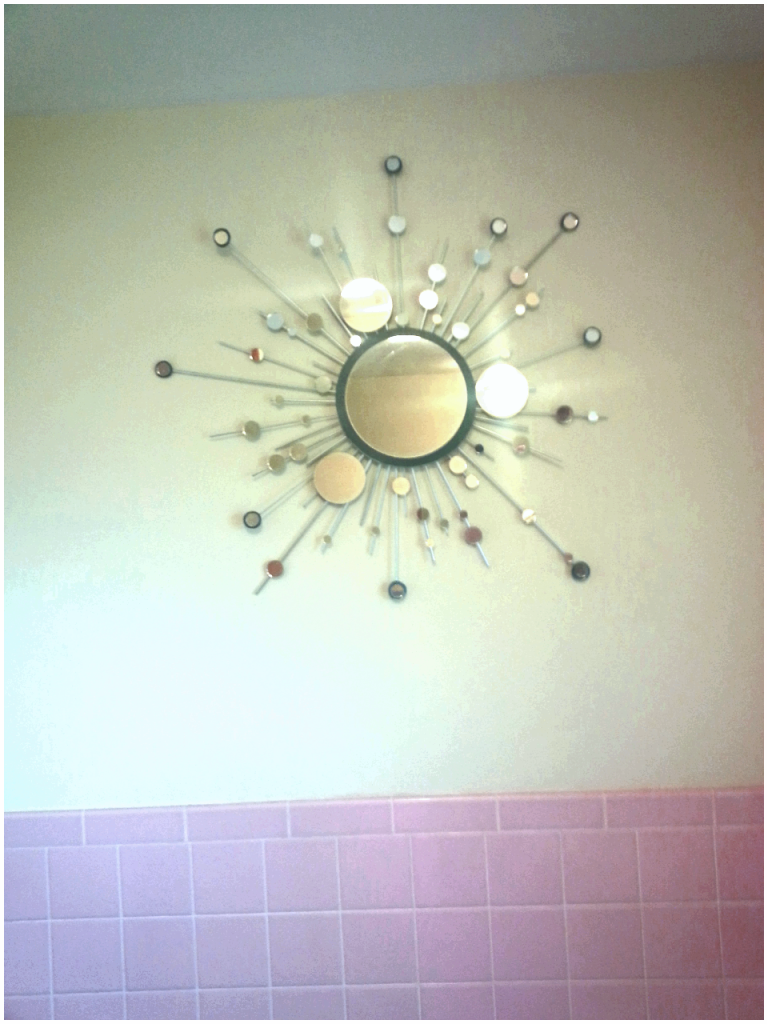
Our upstairs bathroom is so wickedly 60's. It is baby pink and baby blue. It could be so awesome if I had the time and resources to really pimp it out. But, being the full-time, play-at-home, work-from-home mom that I am, my time is super limited. So I have to settle for pimping it out slowly but surely.

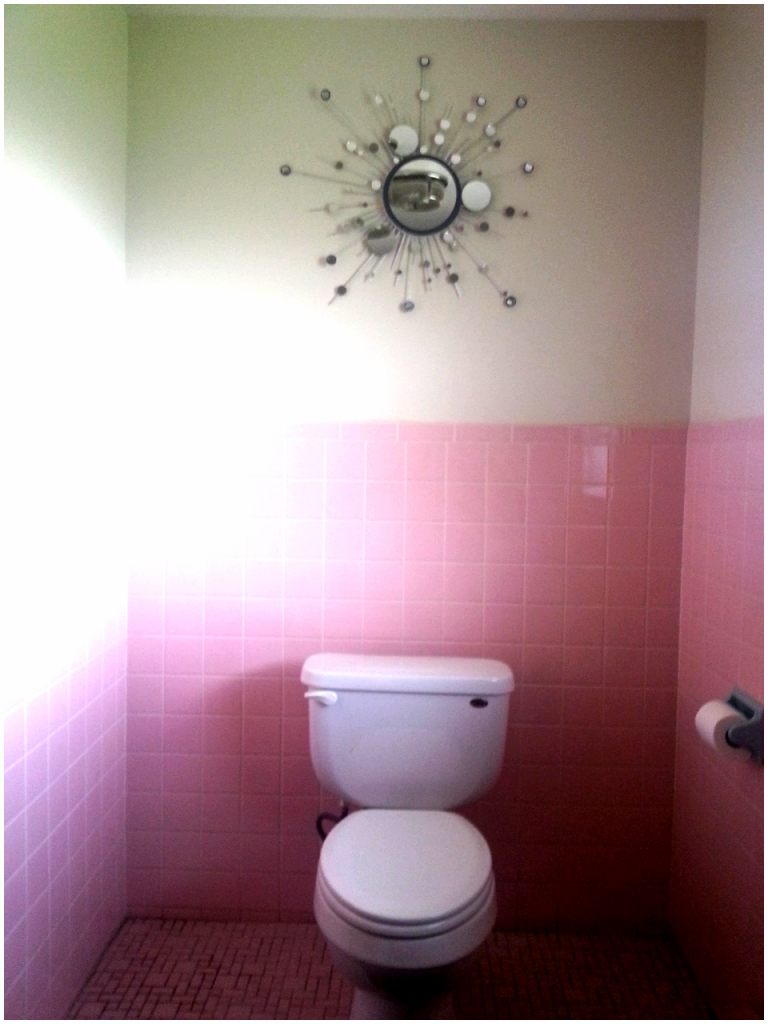
First things first, there was this big empty wall behind the toilet that pouted at me every time I looked at it. It pouted and whined, "Put some art on me RIGHT NOW!" So I took to Google, as I usually do. I searched for pictures mostly, pictures of 60 bathroom artwork, retro bathroom design... things like that. I came across images of cool looking, yet expensive, starburst mirrors. SOOOOO, I Googled something like, starburst wall mirror craft. voilĂ ! I found what I was looking for. One can find anything on the internet, I always say.

I came across a website called 
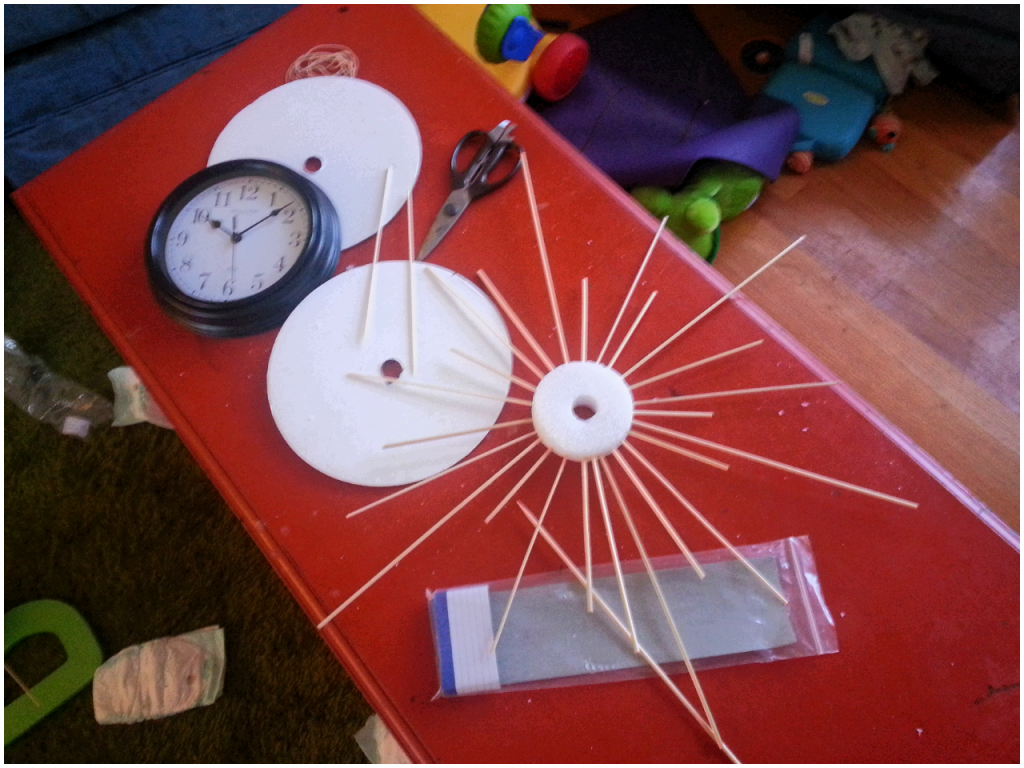
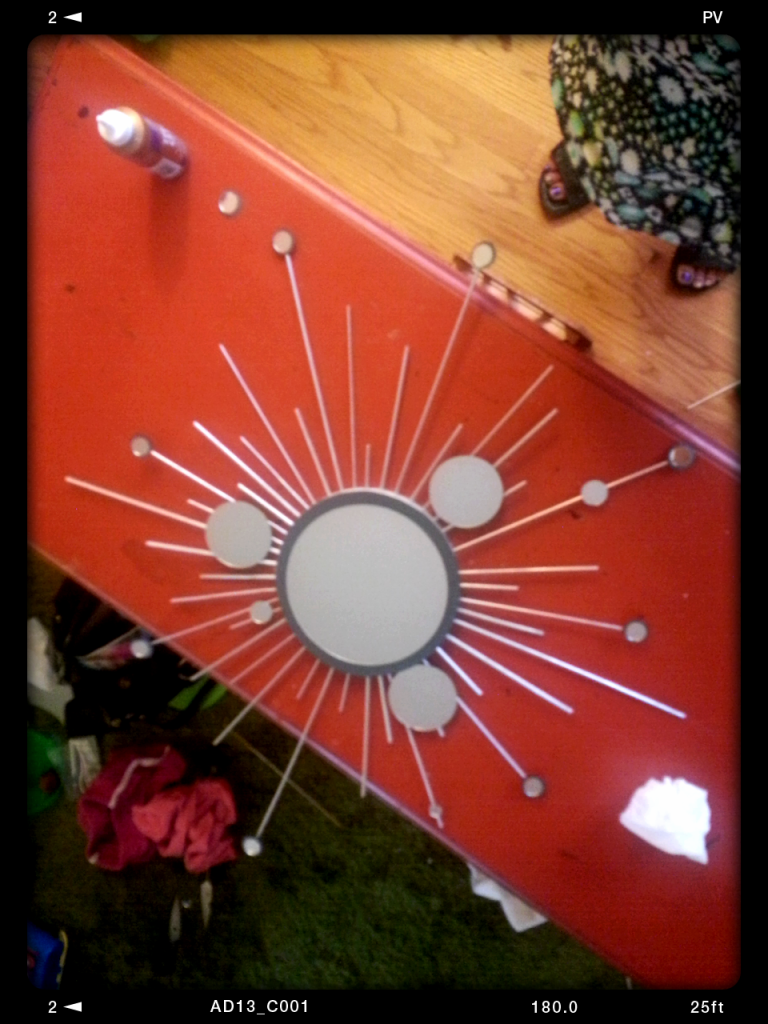
Dollar Store Crafts. There is a great tutorial there on crafting your own starburst mirror. This tutorial was great because I had most of the materials I needed on hand and it was a job the kids could help me with and learn from in the process. Zoey was able to cut some of the bamboo skewers into various lengths with me and both Zoey and Ethan took turns sticking the bamboo skewers into the styrofoam disk. (There might have been some whining and fighting over whose turn it was but it all turned out fine in the end.)


 I had everything I needed already on-hand in the house except for the mirrors and paint. I was actually able to take the kids with me to the craft store to buy the two things I needed to finish the job, I just called the shop ahead of time and let them know I was coming in with three small children and asked if they could grab the items for me to quickly pick up. They were more then happy to oblige.


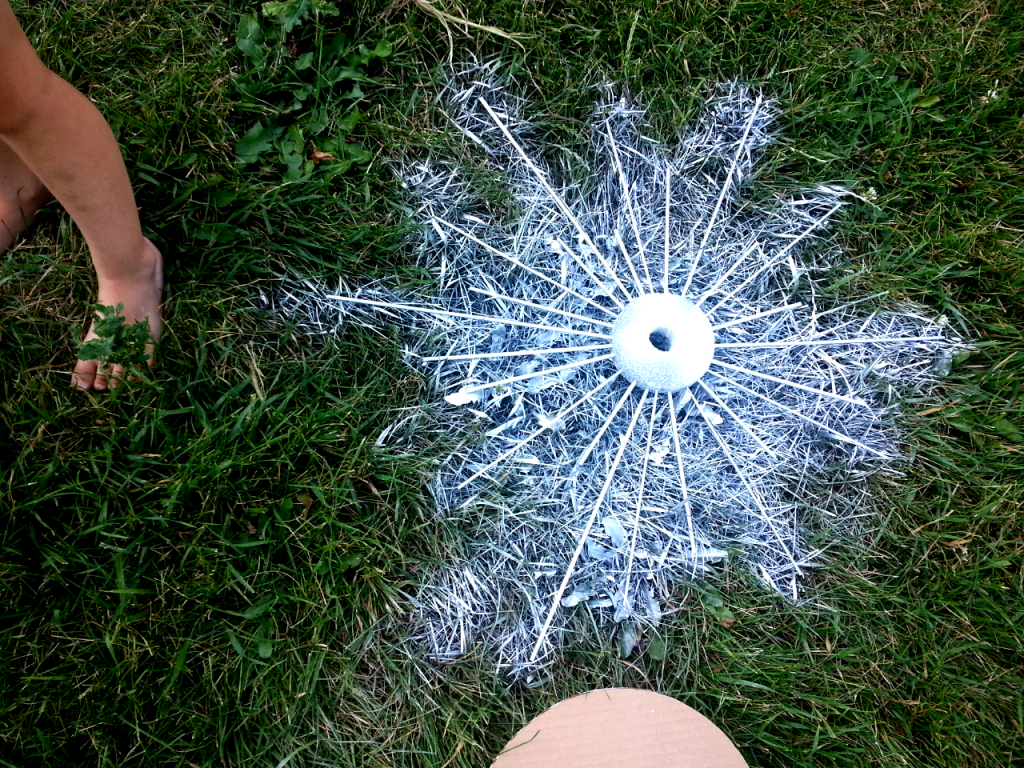
When the time came, we all traveled out into the backyard to spray paint the star we made. The kids were eager to try. Ethan is two and Zoey was three when we did this and neither of them were really able to successfully operate the spray can. They both did make a gallant effort though. Either way, they liked watching me spray.


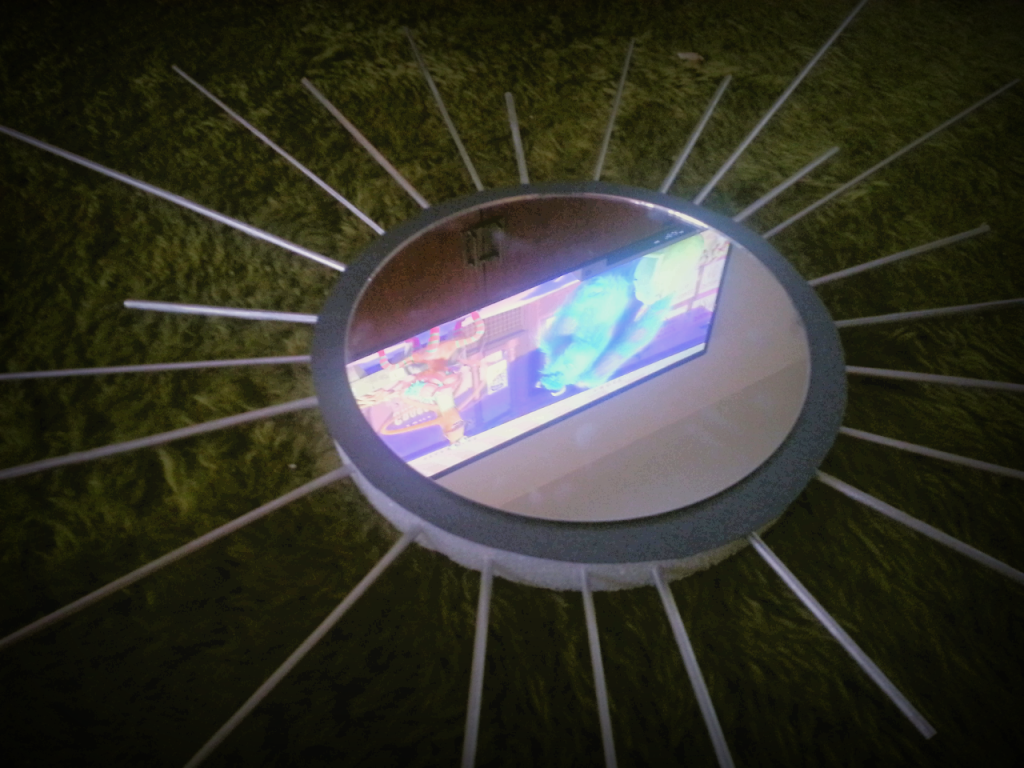
 Once we got back inside, Ethan wanted to watch Monsters Inc. So Zoey helped me assemble the rest of the pieces while "E" played with his choo choos and watched.


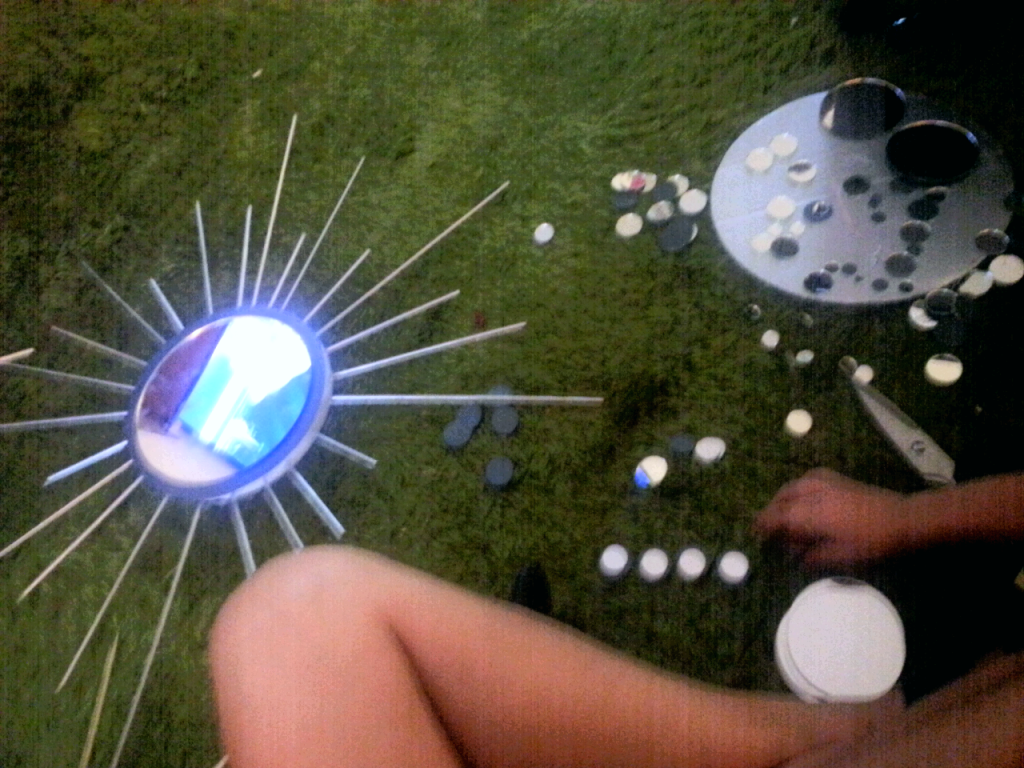
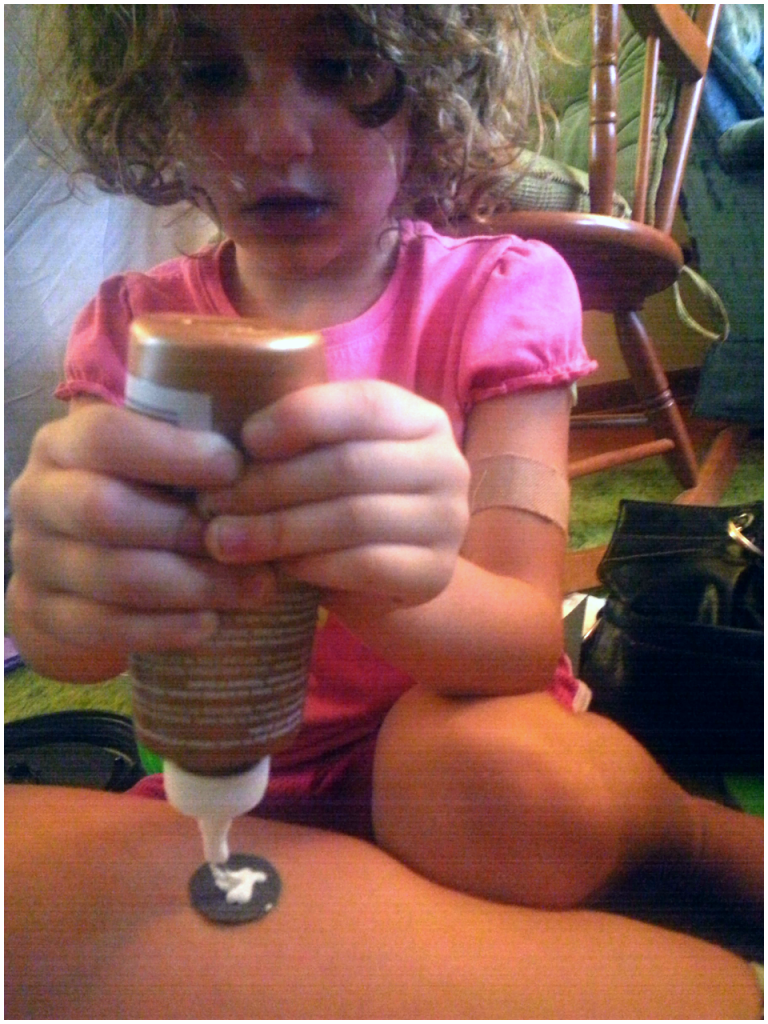
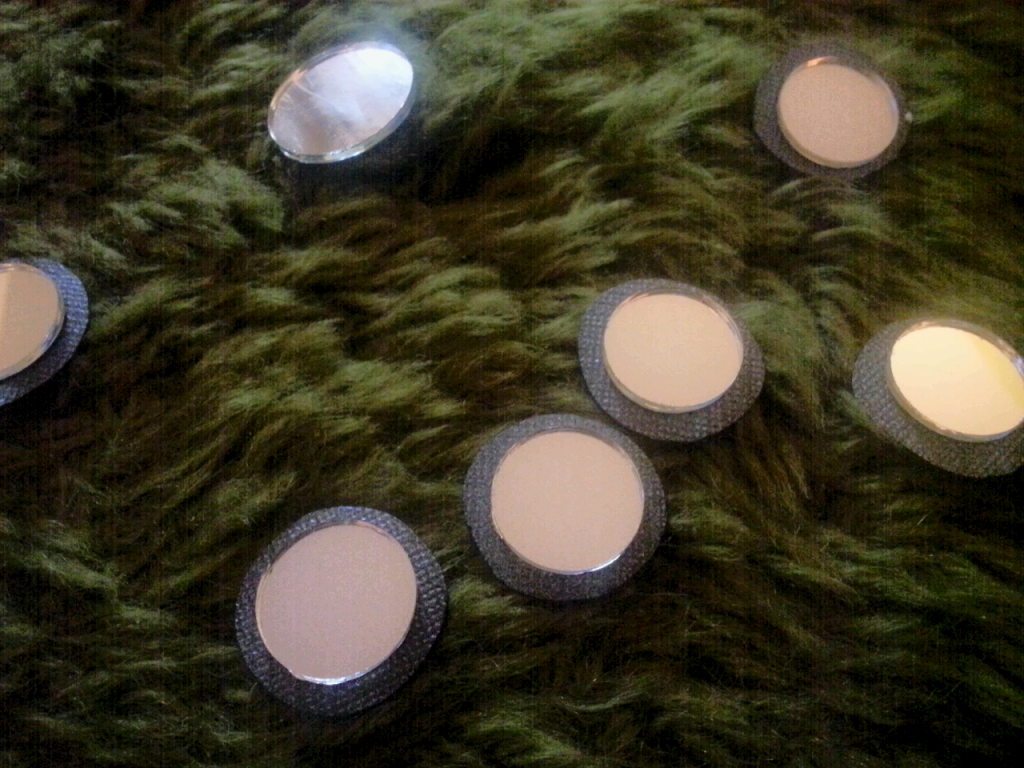
I let Zoey open all the bags of  mirrors and she enjoyed counting and sorting them into different sizes. She also did most of the gluing.


Zo-a-ma-bo eventually got bored and let me know I could go ahead and finish the project on my own. So, Henry played with the kids while I glued mirrors all over the place.  Then I hammered a nail into the whiny wall above our toilet and simple stuck the styrofoam disk onto the nail.


I love being able to get my kids involved in projects like these. I'm always amazed at what a great job they do when given the opportunity to try. And when I'm terribly afraid they will hurt themselves with scissors or get glue all over the carpet, they almost always prove me wrong.